

Making a simple mould

This is a more advanced section of the website, and is intended for older children and adults, as the tools and materials involved can be dangerous.
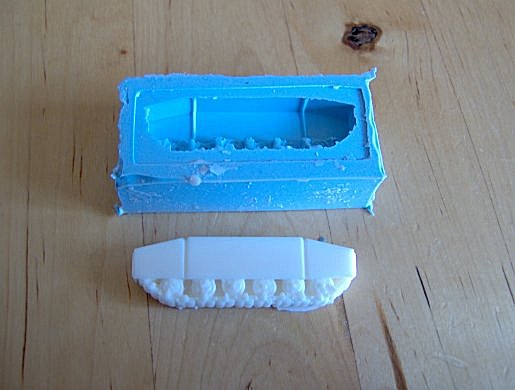
When modelling you will often find yourself having to make the same part more than once. Making a mould and casting copies of the part can save a lot of time. This tutorial will show you how to make a simple one-piece mould, also called an Open mould or a Mother mould. At a later date, we'll make a two piece mould, to cast more complicated parts.
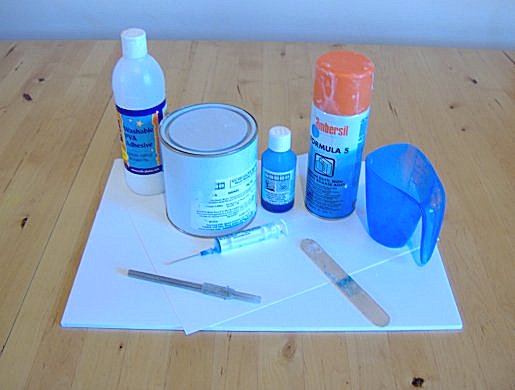
You will need:
PVA glue, or a hot-melt gluegun
Plasticard
A sharp knife
Mould release agent
Silicone rubber
A jug
Mixing spatula (lolly sticks are ideal.)
a syringe or small measuring cup
What to do
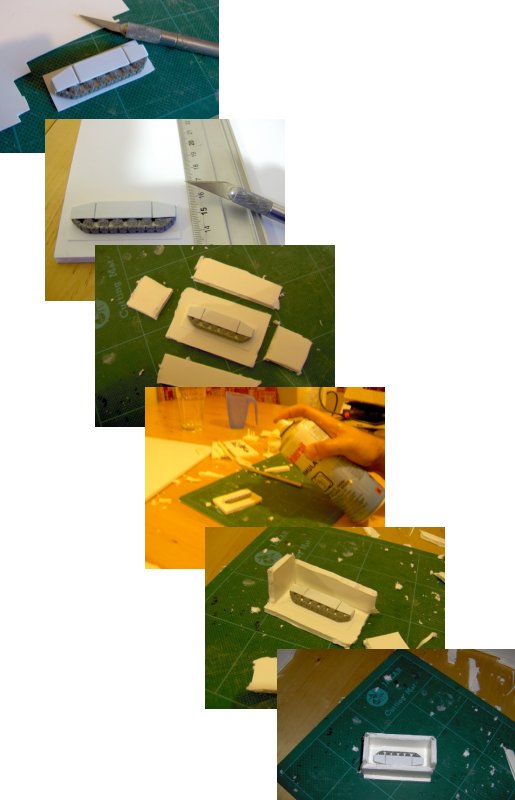
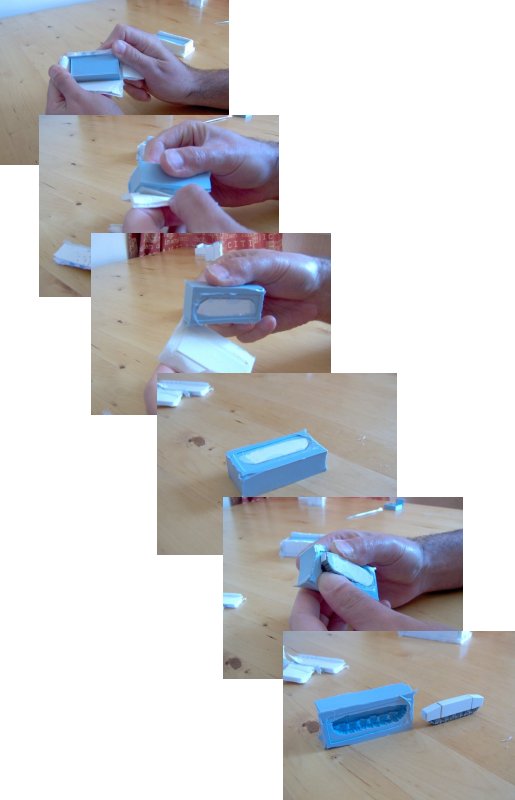
1. Cut a small section of plasticard, slightly larger than the part you wish to mould. Glue the part to it using PVA.
2. Lay the part and the plasticard onto the sheet of foamboard. Cut around it, leaving a border of about 2cm all around. This will form the base of the mould case.
3. Then cut out pieces of foamboard to be the sides of the mould case. Use the base to determine the lengths of the side pieces.
4. Glue the part/plasticard to the foamboard base. Allow to dry, then spray lightly with mould release agent.
5. Glue the side parts onto the base, making sure they do not touch the part, or the plasticard. You can use PVA, but hot-melt glue is faster, and often provides a better seal. You don't want any gaps, or that expensive silicone will dribble away!
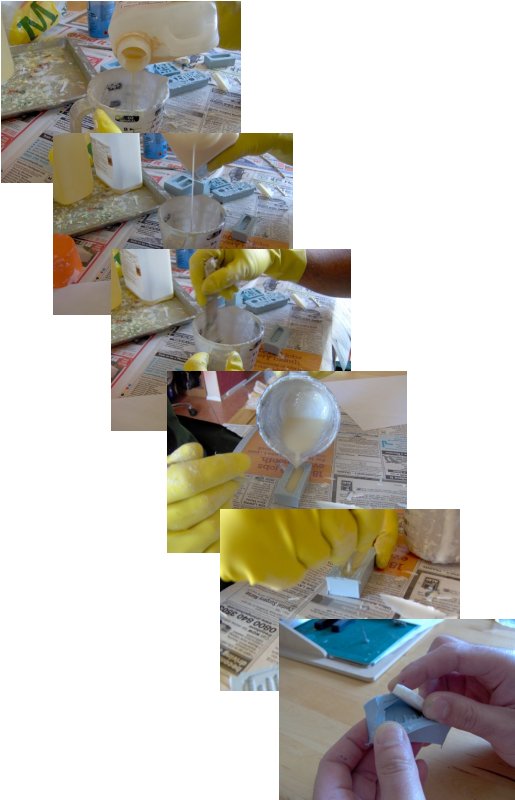
6. Work out how much rubber you'll need for the mould. If you've got lots of time, fill the mould case with water, then tip it into a measuring jug. This will tell you how much rubber you will need. If you are in a hurry, measure the width, length and depth of your mould case, and multiply them together. This gives the volume of the mould case. Now do the same for the part, and subtract the volume of the part from the volume of the mould case. This tells you roughly how much rubber you'll need. But pour a little more! It's frustrating if you don't quite mix enough...
7. Pour the correct amount of rubber into your mixing jug. Then measure out the catalyst which you will have received with the silicone rubber. Most rubbers need 2% catalyst by weight, but check this - it should be wriiten on the pot. Be aware that mixing by volume will often result in a failed mould - mix by weight not volume unless your rubber specifically tells you otherwise! I use a syringe which came with a cheap printer ink refill kit to measure my catalyst.
8. Squirt the catalyst in to the rubber, and stir in thoroughly. Ideally, you'd do this incredibly slowly and carefully to avoid air mixing in. But that's virtually impossible, so I mix fast and well, then let the pot sit for 5 minutes, as the bubbles slowly float to the surface and burst.
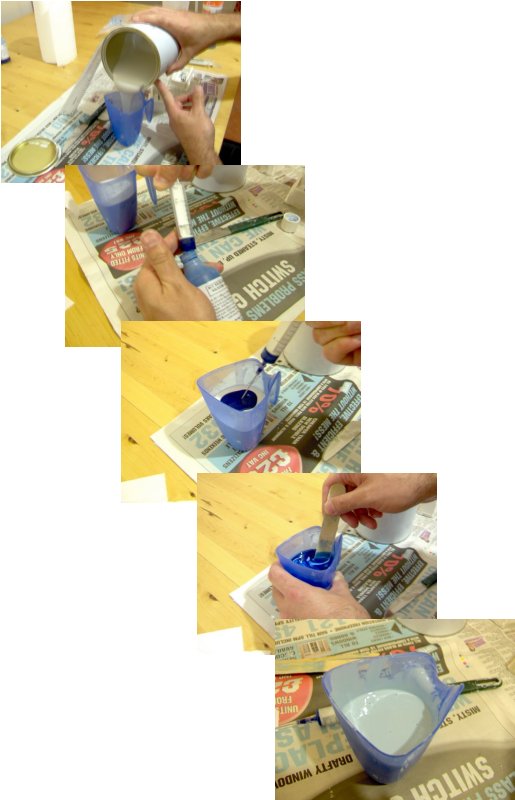
9. Pour the rubber very slowly into the mould at the corner, in a thin stream, avoiding pouring directly onto the part as much as possible. It will flow across the part slowly, reducing the risk of trapped air.
10. Leave the mould to cure - many rubbers cure in a few hours, but I always leave 24 hours to be sure.

11. Once the mould has cured, simply rip the foamcard away, and gently peel the mould off the part. Then the mould is ready for use.
12. If you want to cast a part, you'll need some resin - ideally polyurethane. You'll also need gloves, as resins can be dodgy on the skin. Spray some mould release agent into the mould before casting.
13. Most polyurethanes mix in equal parts, and have a pot life of about 5 minutes. So you'll need to pour into the mould quickly. Often air bubbles will be trapped in the detailed portions of the mould - I use a crochet hook to poke around in the mould and pop air bubbles, because it's got a rounded end, so won't damage the mould.
14. The resin should cure in 20 to 30 minutes, and you can de-mould your part.
Back to the Sculpting and Modelling menu...