

Sculpt a face for a 28mm miniature

This is a more advanced section of the website, and is intended for older children and adults, as the tools and materials involved can be dangerous. Here you will learn how to sculpt a face for a 28mm miniature figure. The 28mm size figures are one of the most popular scales, but the method used will work from 15mm up to 90mm or so.
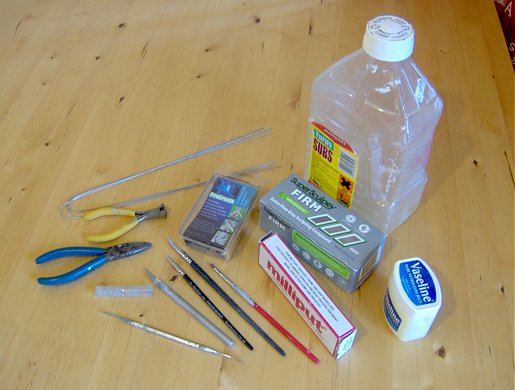
Below you'll see a picture of the tools and materials I use when sculpting. You don't need all of them, and will probably find the tools and products that suit your style as you go. Sculpting is a very personal thing, and there are as many ways of doing it as there are sculpters. So feel free to adapt or alter the tutorial below to suit what works for you.
You will need:
- I use the SG dental tool from Tiranti of London.
Some wire, or an armature.
Some epoxy putty, ideally ProCreate.
What to do
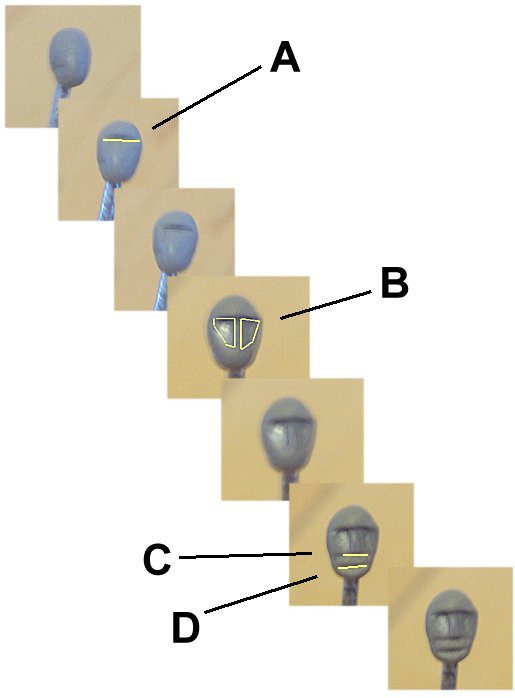
1. Take an small lump of putty, and stick it to your armature, where you want the head to be. Make it oval shaped, and between 3 and 4mm in height.
2. Score a line in the putty for the eyes. (A) Normally the eyes appear about half way up the head, but sculpted hair tends to be thicker than real hair, so the eyeline needs to be two-thirds of the way up the head.
3. Then using the flat of your tool, flatten two roughly triangular areas, with the tops in the eyeline dent. These represent where the cheeks will be. (B) Leave a ridge standing between them for the nose.
4. About halfway down the head, make a short lateral cut (C) this is the bottom of the nose. A millimetre below, make another lateral cut (D) for the mouth.
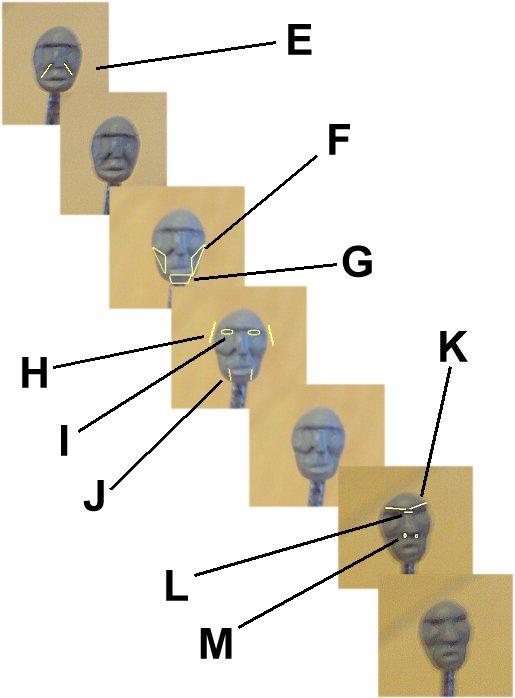
5. Now make two diagonal cuts from the edges of the nose line down to the edges of the mouth line (E).
6. Now with the flat of your tool indent the lower portion of the cheeks (F) and flatten the chin below the mouth line, (G), leaving a small ridge below the mouthline for the lip.
7. Now smooth back the sides of the head below the eyeline (H) and push a couple of dents into the eyeline where the eyeballs will be. (I) Then make two roughly vertical cuts from the corners of the mouth down the chin. (J)
8. Next push the top of the eyeline down into a very shallow 'V' shape (K) and make a small cut at the top of the nose. (L) Then with the point of your tool poke a couple of nostrils up into the underside of the nose and add a filtrum (the vertical dent between your nose and upper lip.) (M)
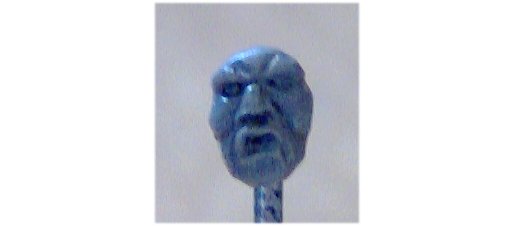
You now have the basic face - you can either tidy it up and leave it, or add an expression. As most 28mm figures are used for wargaming, I've shown how to add an angry expression below.
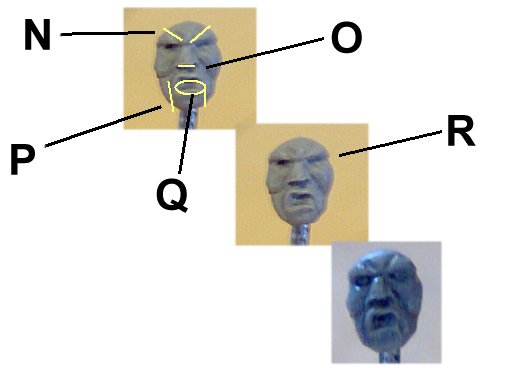
9. Increase the depth of the 'V' on the brow, and cut in two shallow lines to show a frown. (N) Gently push the base of the nose upwards, as noses tend to contract when we are angry or shouting. (O) You may wish to add a couple of wrinkles across the top of the nose too. Deepen the cuts alongside the mouth, (P) and open the mouth up (Q). Tidy up where needed, and allow to cure.
10. Once the face is cured, you can go back and add eyeballs. Get a tiny piece of putty. Really, really tiny. I usually have to try again and again here, because I always start too big. But once you have a small enough piece, simply poke it into the eye socket, and smooth it out. If you're feeling brave, you can even add eyelids, with a very delicate cut of your tool.
Back to the Sculpting and Modelling menu...